Showing posts with label Art. Show all posts

Monday, May 9, 2011

in the messy room ~ bubble paper prints

We have a room in our basement, just off the playroom that has been designated as the “messy room” a room for all things messy. Everything from play dough to art projects, to crafting to the sensory table. A room that we can go and have tons of fun and make a mess and I don't have to clean it up right away – I just have to shut the door and pretend its not there.. which is sometimes nice : )

Last week in the messy room Lucas did some painting and printing with bubble paper.

IMG_9266


IMG_9280 


IMG_9282

Friday, March 4, 2011

finger paint gone wrong


I made a batch of finger paint this morning from the recipe I found in the book First Art by Maryann Kohl, I followed the recipe/directions but it did not turn out quite right - I think maybe I over cooked it....

IMG_7525

It looked great but when we tried to use it, it was too thick and jelly like to paint with.

IMG_7532

Luckily Lucas like the jelly glops of  gloop…

IMG_7543

and our painting activity turned into a sensory activity…

IMG_7559

We played in this squishy mess for a good part of our morning

IMG_7575

I hope to recreate this mess again soon ‘cause this little man had a blast!

Tuesday, February 8, 2011

puffy paint


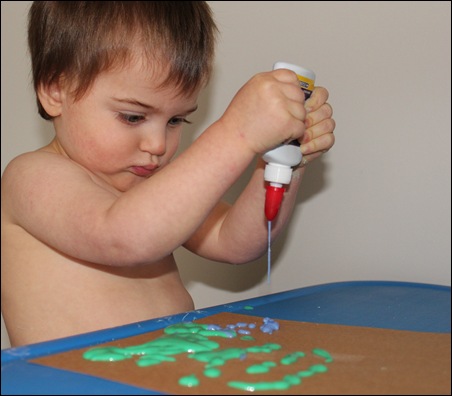
Lucas enjoyed working with puffy paint yesterday, I knew he would since the viscosity is somewhat similar to glue… and he loves glue!

IMG_6782 copy

I made a batch and separated it into three different colours, I used old shampoo bottles and an old glue bottle. Lucas preferred the glue bottle since it was smaller and easier for his little hands to squeeze.


To make puffy paint:

    • 1cup of flour
    • 1cup of salt
    • 1cup of water
    • empty squeeze containers
    • 1 Tablespoon tempera paint –as many colours as you want

Mix the first 3 ingredients together in a big bowl.

Divide the mix out into smaller containers – one for each colour

Add 1 Tbsp of tempera and mix well. Adjust the colour by add another tsp of paint until desired colour s reached

Pour into squeeze bottle – a funnel will make this easier or you can spoon the mixture.

Give the child the bottles and watch them get to work!


* this paint does not work well on construction/craft paper. Instead use matte board or card board, we used and old cereal box cut up!

IMG_6772 copy

Wednesday, February 2, 2011

stART ~ Art’s Supplies


Art's Supplies


The book starts off with Art saying “its not my fault… my supplies have a mind of their own!” then the book goes on “the paper started it by inviting everyone to her pad for a party”. It doesn't take long for the pencils to arrive. They are soon joined by crayons, markers, pastels, ink, glue, scissors, and paint. This book creatively explores the process of children creating art.


However there is a BIG part of the book that I did NOT LIKE… on every page Art’s supplies are talking and making comments. Some are cute and clever like the crayons saying “lets colour outside the lines” others are rude and inappropriate like the pencil talking about his butt, and the markers talking about having the runs and making references to alcohol – that completely ruined what could have been a great book.


I gave the kids large sheet of paper and some pencils, markers, crayons and pastels.
IMG_6855

Once they had coloured for awhile I gave them scrap paper, scissors and glue.IMG_6864

Lucas LOVES working with glue, we easily go through a bottle a week!IMG_6868

“just when I thought it was over, the paints arrived.” ~ a line from the bookIMG_6882

although I was not satisfied with our book, I loved this art project. It was great to just let the kids create after doing so many structured crafts the last few weeks!IMG_6887


See other great stART projects by visiting A Mommy's Adventures!

Friday, January 28, 2011

Valentine Art

Last week when Dominic stayed home from school we got out a large sheet of paper, and some oil pastels and started doodling&scribbling

IMG_5938

IMG_5937

IMG_5931

Once we were finished I gave Dominic some pink acrylic paint (watered down) to paint over top.

IMG_5942

I love the hearts he drew!

IMG_5944

Once it was dry we cut out the hearts, and traced and cut out the word Love.

IMG_6028

It is now hanging on the wall in our dining room.

Thursday, May 20, 2010

STart ~ Mouse Shapes

This week for our STart project we read Mouse Shapes by Ellen Walsh

Mouse Shapes

And for our art project we did shape prints using the shapes from our shape sorter toy

He really enjoyed this project, he thought it was fun to bang the shapes and watch some of the paint splatter

He had so much fun with this that by the end we could barely see the shapes anymore : )

and of course it would be a true painting experience if he didnt get a taste, right?


Visit A Mommys Adeventures to find other STart projects!


Thursday, April 8, 2010

STart ~ Whose Toes Are Those?


The book we chose for our STart project this week was - Whose Toes Are Those by Jabari Asim 


Whose Toes are Those?

The book itself is not that great... One of my least favorites but Lucas enjoys it for the bright picture so we do read it quite often. The art project we did to go along with this book is painting with our feet!

I had originally planned to do this outside but its been raining here everyday this week. So I set this up in our bathroom instead that way I could just throw him in the tub when he was done : ) 


First he painted for a bit with his hands....

Then I showed him to put his feet in 
He loved squishing the paint between his toes


He had a BLAST!!


Be sure to check out other STart projects by visiting A Mommy's Adventures 

Monday, March 22, 2010

Coloured Salt

Dominic and I made some coloured salt last week - to make one of these.

Today we used some more to make pictures.

Dinosaurs of course!

a BEAUTIFUL mess!


Lucas joined in on the fun too...


I put the the salt  into old prescription bottles and poked some holes in the top. This is what we use as "sparkles" most of the time - cleanup is much easier!!

Dominics picture when he was finished.

and here it is again after it dried and we shook off all the extra salt.